An External Hard Drive: the easiest method for making a quick copy of your important stuff. Photo taken by flickr user Miss Karen
All, right, so you’ve heard it over and over and again, and you know it’s true: you need to make regular backups of your stuff. But how? What options do typical computer users have?
In the past few years, the options for preservation and backups have expanded quite a bit, giving users an enormous array of solutions to choose from. Of course, the diverse options can be confusing: what’s the best choice for you?
The backup options out there can be grouped into two major categories: local storage and cloud storage. Each has their strengths and weaknesses, and will appeal to different users based on where and how they use their computers. Some of the best and most secure backup strategies make use of both solutions… a backup-of-the-backup, so to speak. I’ll discuss that further in a later write-up.
In this article, I’ll talk about local storage. In the next article, we’ll go into cloud-based solutions.
Physical Media
Local storage is pretty straightforward stuff. It involves using what we commonly call physical media; something you can hold in your hand, physically insert, remove, connect or disconnect with your computer. In the past this was pretty much the only option available to most people on their home computers, and so it’s the one people are most familiar with.
Until recently, backing up with local storage often meant using removable disk media like CDs and DVDs to make copies of small groups of files at a time (or if you were really old school, you might remember 100/250MBMB Zip Disks, 1/2GB Jaz Drives, or even floppy disks and old, expensive backup tape drives). And for some people, DVDs CDs and Blu-ray disks are still the medium of choice for making copies of their data and their work. It requires a lot of juggling of multiple discs if you have a lot of stuff to back up, and is often labor intensive too, but can work reasonably well if your needs require it.
But more modern solutions are faster and easier to work with: External drives using USB, FireWire, Thunderbolt and LightPeak interfaces make quick work of adding lots of storage and making thorough copies. And making it even easier are the built-in backup services now available in Windows (starting with Vista) and Mac OS X (starting with Leopard) that automate the backup process, without your having to buy any extra software to make it all work.
Costs
Most of the investment required for local backups is up-front: you will need to buy your storage media. Often, that’s an external hard drive, and as of this writing, a relatively roomy (for now anyway) 3 TB external USB hard drive can be had for about $130, with lower capacities going for half as much. Software might also cost you some additional money if you choose to go with third party vendors, though most modern operating systems now offer a built-in or easily-installable backup solution. Most of this article will be spent talking about those built-in solutions, because they work quite well for most people.
Pros and Cons
No doubt, the physicality of the backup – the fact that it’s right there, on separate box or separate set of media – is the prime advantage for local backups. You know where your data is, and you know how safe ti is at all times. It’s also relatively inexpensive. Once you buy the media you need to handle the backups (and any software), there tend to be no ongoing costs to keep things running smoothly. Of course, once your backup storage fills up, you will need to decide whether you want to buy more, or are simply happy with making room on the existing storage by dropping old copies in favor of newer ones.
The disadvantage to this physicality is that care must be taken in the event a catastrophe of some kind takes out both your computer and the backup. Having your backup hard drive and your computer in the same room won’t help you very much in the event of theft, fire, flood or other physical disaster that wipes out the hardware. For this reason, if local storage is all you plan on using for your backup strategy, it might make sense to buy more than one set of hard drives for example, make backups on both, and keep one in an off-site location, just in case.
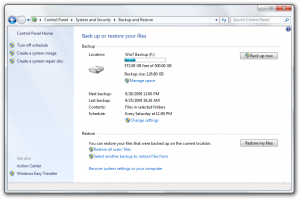
Windows: Backup and Restore

Windows Backup and Restore is useful for taking a total snapshot of your computer, or if you’re the tinkering type, you tell it exactly which folders and files you want to keep backup copies of. Paired with an external drive, you can tell it how often you want you want to refresh your backups, and how many different versions you’d like to keep.
Backup & Restore has two basic modes: disk image and incremental backup. In the former, a total snapshot of your computer’s hard drive and all of its files are kept in an archive. In the latter, the backup service adds to the archive as it goes, making note of files that are added, removed or changed as time goes by.
Backup & Restore was made available starting with Windows Vista and 7, and is a nice, ubiquitous, easy to use utility that really made backups simple for Windows users. For previous versions of Windows (including XP), there is a built-in service called NTBackup, but it’s far less user-friendly, not quite as automated and not commonly used.
If you’re still using Windows XP, you might want to consider some third party options for local backups. Vendors such as Acronis and Symantec offer solutions that are just as automated, but of course will cost some extra money.
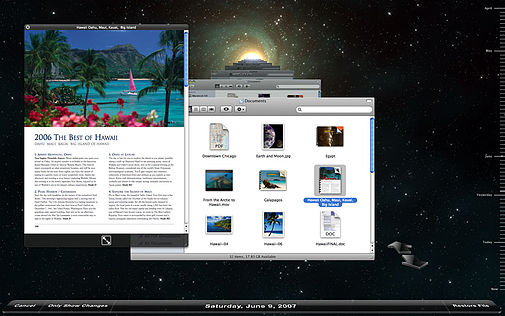
Mac: Time Machine

For the Mac, Time Machine is an equally-ubiquitous solution that was released in late 2007. The instructions for using Time Machine are incredibly simple: plug in an external drive, and your Mac will ask you if you want to use it for backups. Click “Use as Backup Disk,” and that’s it!
The features Time Machine offers are also leagues above most other backup software out there. The files that changed aren’t just updated in a flat incremental backup, but actual versions are kept. You can virtually “go back in time” with your computer’s hard drive and see what changed when, hence “Time Machine.” And it does all this with a minimum of storage overhead: aside from your first full backup (which takes up the most space), each additional snapshot of your Mac will only take up whatever space is absolutely necessary to note what’s changed since the last time the software had a look.
This level of richness does come at a price though: the settings and intervals that time Machine uses for backups aren’t customizable. So, whether you like it or not, you’re getting snapshots of your computer for every hour over the past 24 hours, every day for the past 30 days, and every week past that, until your backup hard drive gets full (at which point, the oldest backups are discarded to make room for newer ones). As a general rule, Time machine will try to backup everything on your hard drive, but you can give it a list of which individual folders you’d rather it not keep copies of, should you be so inclined.
If full, detailed customization is absolutely what you need, then fortunately there are still a few pieces of third party software out there that can do the job. The most commonly recommended (outside of Time machine itself) is Carbon Copy Cloner, which will let you schedule and specify the times and levels of thoroughness your backups should have.
What About Linux?
The Linux platform has a lot of great virtues going for it, primary of those being that there is a rich, diverse mix of developers working hard to contribute to it, and that diversity means there’s so many different flavors of the operating system that people can chose from. The same is true for the type and number of backup utilities that exist out there.
However, the double-edged sword to this diversity is that there really isn’t a single go-to utility that is already bolted on and ready to go. Though, if you’re an avid linux user, there’s a good chance that you’re well aware of the diversity out there, and probably chose your platform on that very basis.
That said, I would highly recommend looking at this article: 10 outstanding Linux backup utilities. It pretty much runs the gamut of the more commonly used solutions available, and they vary widely in their ease of use, customization and features.
I’ll also take this opportunity to point out that I haven’t even come close to an exhaustive list of local backup software for Windows or Mac platforms, and searching around online will no doubt yield plenty of other options. That said, the fact that both of these Operating Systems have recently incorporated their own easy-to-use (and free) backup solutions, the field of vendors has shrunk quite a bit in recent years.
Plain old copying
Last but not least, there’s the tried-and-true method of making a backup that works on every operating system out there: the good old manual copy. By far this is the most customizable option: nothing gets backed up unless you make it happen. The bad news? Well… nothing gets backed up unless you make it happen, either through dogged determination and remembering to run the backup procedure, or fashioning your own script or bit of code and scheduling it to run at a certain frequency.
If this is the way you’d like to back up your stuff, then more power to you. However, based on the experience I’ve had (both my own stuff and with how colleagues and friends behave), I’ve found this to be the least reliable way of making sure your stuff is kept safe.
What do I use?
Since 2007, I’ve been a Mac user, so my laptop and desktop systems are faithfully and easily backed up on local drives using Time Machine. I’ve used it on multiple occasions to restore accidentally-deleted or changed files, and have a couple of times used it to do full restorations (including once when my laptop was stolen, and all that was left of the stuff on it was the Time Machine backup image on a hard drive kept at home).
I also use Linux desktops and servers for a number of projects (including this blog), and maintain local backups of those systems using rsnapshot, a nice utility that runs in the background and makes periodic incremental backups of everything I tell it to. In many respects it has the functional utility of Time Machine for the Mac, though it lacks the pretty graphical interface. I highly recommend it if you run linux servers and want a complete but basic, no-nonsense local backup strategy.
