NY Times Article on the realities and costs of Born Digital preservation
Mar 16th, 2010 by Isaiah Beard

Salman Rushdie. Source: Wikipedia. Click on image for link to source.

The New York Times today published an article that reflects some of the challenges of preserving born digital content – that is, documents, data and other content that has been created digitally, on a computer or electronic device, and for which there is no physical original (such as on paper).

In particular, they highlight the efforts of Emory University, in preserving Salman Rushdie’s archival materials.

Among the archival material from Salman Rushdie currently on display at Emory University in Atlanta are inked book covers, handwritten journals and four Apple computers (one ruined by a spilled Coke). The 18 gigabytes of data they contain seemed to promise future biographers and literary scholars a digital wonderland: comprehensive, organized and searchable files, quickly accessible with a few clicks.

But like most Rushdian paradises, this digital idyll has its own set of problems. As research libraries and archives are discovering, “born-digital” materials — those initially created in electronic form — are much more complicated and costly to preserve than anticipated.

Electronically produced drafts, correspondence and editorial comments, sweated over by contemporary poets, novelists and nonfiction authors, are ultimately just a series of digits — 0’s and 1’s — written on floppy disks, CDs and hard drives, all of which degrade much faster than old-fashioned acid-free paper. Even if those storage media do survive, the relentless march of technology can mean that the older equipment and software that can make sense of all those 0’s and 1’s simply don’t exist anymore.

Imagine having a record but no record player.

An interesting aspect of this collection and its exhibition is that it emulates the experience Rushdie had in creating the content.  Rather than just viewing the finished documents, you get to see the computer desktop as he saw it, open up the same applications he used, all in the 1980s and 1990s technological contexts… and not using the modern, Web 2.0, Windows 7 or Mac OS X trappings we’re accustomed to in today’s computers.

I think this article is an excellent read, irrespective of what one’s views may be on the subject matter.  Material of all kinds, in increasing amounts, faces the same perils as this collection every day, and archivists everywhere, including this one, wrestle with how best to retain it all.  So far, the only tried and true method for such types of preservation is to obsessively manage and migrate the content, and that requires making tough decisions as to how to proceed, what formats to migrate to, and hoping the decisions made are the right ones to keep the content viable, at least until the next generation of technology requires that the hard decisions be made again.

Reel2Bytes: Digitizing 1950s-era analog tape
Feb 23rd, 2010 by Isaiah Beard

Of all the work I do, I think dealing with older formats, and just figuring out how they work, is the most interesting aspect.

A few weeks ago, a stack of old open real tapes arrived, along with a similar-vintage tape player.  The recordings were done in the early 1950s, as part of a project to record the oral histories of various labor officials who were active in the early 20th century.  The recordings made it unequivocally clear that the intent was to allow students and researchers from decades into the future to get insight on the history of the labor movement in the state.

Well, for quite a few years, these tapes remained shelved and seldom accessed, until a faculty member from the School of Management and Labor Relations learned of their existence and wanted to use them in his courses.  Owing to the age of the recording format, the scarcity of playback equipment, and the condition of the tapes, there is no way that multiple students would practically access the tapes and have them survive.  But, that doesn’t mean the content should stay inaccessible.

And so, after getting a demonstration from out Special Collections staff on the best way to handle the tapes, and after mustering the courage to risk handling them, the player was hooked up to more modern digital recording equipment, and the digitization had begun:

I’ve always heard people talk about what wonderful sound fidelity the old open reel tape formats had, and they’re right; the sound quality is great, particularly for 55+ year old recordings. The physical condition of the tapes left much to be desired though: one reel had a paper backing, and was extremely fragile. Just playing it back was a white-knuckle experience. It’s a shame too, because one thing you do miss in the migration of old content to digital formats is the experience of handling these old things, and getting them working again. The operation of the tape deck; threading the tape, feeling the very mechanical-ness of the format and how it worked… these are things that modern digital formats have yet been unable to duplicate or preserve.

Additional photos of the setup and the reels themselves appear below the cut.
Read the rest of this entry »

Designing and Implementing a Center for Digital Curation Research
Nov 17th, 2009 by Isaiah Beard

The facility I work in at Rutgers, known as the Scholarly Communication Center (SCC), has a fairly short history in the grand scheme of academia, and yet a fairly long one when it comes to the rapid changes in technology it has seen in its lifetime.  It was originally started in the 1996, and meant to be a location for university students and faculty to access a growing body of the then-nascent collection of digital content.

Back then, the internet still wasn’t very fast and wasn’t nearly as media-rich as it it seems today.  And so, most of the data-heavy reference materials arriving in digital form came to the SCC as CD-ROMs (and later, DVD format).  To accommodate this, the SCC had a lab of ten desktop computers (known as the Datacenter), dedicated solely to accessing this type of material.

But the times changed, and so did the way people accessed digital material.  As the ‘net grew in size and capacity, it no longer made sense to ship reference material on disc, and so the access moved online.  Students migrated from visiting computer labs to bringing their own laptops (and later, netbooks and handheld mobile devices).  Traffic at the datacenter dropped to virtually nothing.  The space had to be re-tooled to continue to be relevant and useful.

And so, with my taking on the newly-minted role of Digital Data Curator, and in collaboration with my colleagues, a new plan for the former datacenter was developed.  Instead of being a place to merely access content, we would be a place to create it.  Analog items that needed to be digitized would be assessed and handled here.  New born-digital content would be edited, packaged, and prepared for permanent digital archiving in our repository.  We would be a laboratory where students getting into the field – and even faculty and staff who have been here a good while – would learn, hands-on, how to triage and care for items of historical significance, both digital and analog, and prepare them for online access.

The concept for a new facility was born.  And we call it the Digital Curation Research Center.

The center is still in “beta,” as we plug along with some internal projects for testing purposes along with a couple of willing test subjects within the university and surrounding community.  This is so we can test out the workflow of the space and make tweaks and optimizations as needed.  Our plan is to officially launch the space in the Spring of 2010, with a series of workshops and how-to sessions for the various things that make digital curation vital (e.g. digital photography, video editing, audio and podcasting, and scanning).

The plan is that this will be a continual, evolving learning experience for all involved.  People who have never really used cameras and recording equipment in a historical context will learn just how increasingly valuable the content they create, and the stories it will tell, can become over time.  And those of us in the DCRC day in and day out will encounter things that we’ve never run into before, and will have to wrap our heads around the issue of preserving it effectively.

Below are related documents that provide additional information about the DCRC.  More information will be coming up as we get closer to the official launch:

The case for improved large file support in digital repositories
Nov 2nd, 2009 by Isaiah Beard

As the person responsible for handling the various file formats in RUcore, the digital library repository for Rutgers University Libraries, I’ve been looking with trepidation at the increasing sizes of the digital assets people are starting to create.  In 2004 when the architecture for this was first envisioned, very few digital items grew past the hundred-megabyte point.

How things have changed!  Video and even audio files are routinely pushing into the gigabytes, now that technology has progressed to the point where high-definiteion video and audio can be originated for ubiquitous mobile devices.  And as RUcore and other large repositories seek to preserve this content, we are finding ourselves running into a hurdle we did not anticipate: the ability for our architectures to handle these very large digital files.  In particular, files larger than 2 Gigabytes has posed some exceptions forFEDORA, our infrastructure of choice, and this is a very big deal for video content in particular.  Consider that 2 Gigabytes can comprise less than 5 minutes of HD content, and you can see our dilemna.

Added mechanisms to support these large items has been slow in coming, and have presented some difficulties of their own in implementing.  For this reason, I’ve drafted a document which explains our position on why we need uniform large file support in digital repositories.  Feel free to have a look and provide feedback.

With any luck, developers will heed the call presented here and in other institutions,a nd work to make better support for big files a reality.

The scanner: workhorse of photo and document preservation
Sep 14th, 2009 by Isaiah Beard

Pretty often, I get questions by phone and e-mail from people who are just getting started with their digital preservation projects, and need to scan photos or documents.  Almost always, they seek advice about what kind of scanner to buy.  A lot of times, the questions are similar:

I this article, I hope to lay down some basic recommendations to get beginners looking for a scanner that suits their needs.

The first step: consider the size of the task

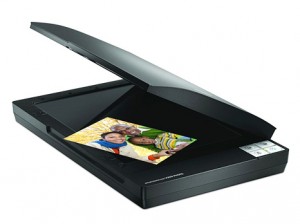
For most people at home, and even some institutions with objects to scan, the vast majority of documents ripe for scanning will physically fit in a letter-sized, flatbed scanner (such as the one pictured at the top of this article).  For these types of collections, the vast majority of scanners out there will be just fine for your needs.  However, there are people who have larger objects: photos and maps as large as 11 inches by 17 inches, or perhaps even bigger.  And then there are the smaller items and specialty objects: photographic negatives, slides, and contact sheets.

And so, the first step should begin before you even buy the equipment: take stock of your archives and find out if they have any specific needs.  Consider how much of your collection are large items, and how much of it consists of very small objects, transparencies, film and negatives.

If your large items comprise only a small amount of your total items (say, 10-15% or less) and you don’t see yourself acquiring more in the near future, then you might get away with a standard-sized scanner, and outsourcing the digitization of these large objects to a third party.  Some local print shops, and even national chains like Alphagraphics and Fedex Office provide these services for a fee, or can refer you to a vendor.  Additionally, our own facility at Rutgers provides a similar service to the public for a nominal fee, based on availability.

If removing these objects to an outside location is out of the question, if the amount of oversized objects you’re scanning is large, or you plan on digitizing oversized objects regularly, then it may be wiser to invest in a specialty scanner that handles these objects.  You’ll also want to look for transparency and film support in any scanner, if your collection contains these types of objects.  I’ll list a couple of examples in a bit.

The second step: consider the capabilities of what you want to buy

For most applications, you really won’t need to spend a whole lot of money to get a good scanner.  However, getting something excruciatingly cheap can come with a price.  A happy medium needs to be found between these two competing factors.

I’ve developed a set imaging standards that set minimum resolutions for scanning photographs and documents.  600 dpi is a minimum we commonly aim for, and you’ll find that even the cheapest of modern flatbed scanners can meet this requirement.  Even so, I’m recommending to most buyers that they look into scanning equipment that optically scan at least at resolutions of at least 4800dpi.

Why is this?  Mainly because while 600dpi is just perfect for things that are 4 x 6 inches and larger, you will need to scan at much higher resolutions for things like wallet sized photos, small postcards, and especially those slides and film negatives.  Such small items pack a large amount of detail in a tiny space, and a lot of that gets lost when you just assume everything will be okay when scanned at 600 dpi.
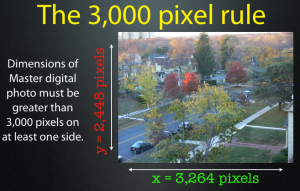
The main caveat I’ve placed in my standards documentation is the 3,000 pixel rule: the idea that in order to get a decent amount of detail out of any object, at least one side of the image must be at least 3,000 pixels long or wide.  For small 35mm slides or even 3 x 5 inch photo prints, 600 dpi just isn’t high enough resolution to meet this goal.  And so, higher resolution settings have to be used to capture the necessary detail.  It’s not uncommon for us at the SCC to scan slides as high as 3200 dpi to get an effective, detailed scan.

The good news is that most scanners are very reasonably priced and yet deliver excellent features and high scanning resolutions.  It’s possible to get a good, current, letter sized scanner with adequate film and transparency capability for under $100 each.  Unfortunately, larger flatbed scanners (mostly the 11 x 17 inch variety) are more of a niche market, and can be expensive.  Expect to pay between $1,000 and $5,000 for such devices, and solutions for bigger items might be even higher.

One other thing to keep in mind: if your collection is largely consisting of three dimensional artifacts, or even really large two-dimensional maps (12 by 14 inches or wider) then a flatbed scanner is not what you’re going to need for visual imaging of these kinds of objects.  You will definitely need to invest in a different solution, such as a good digital camera and possibly an appropriate imaging platform, or look into outsourcing this work to a capable third party.  I’ll do up a writeup of some of these options in an upcoming blog post.

Making  your decision

Once you have the needed requirements and criteria down, it’s time to do some shopping.  There are multiple online vendors out there, and they all have a wide array of different scanning equipment you can buy.  Fortunately, most have the capability to narrow down the available selections based on what your looking for.  If you have a preference for a specific brand, or want to just limit to larger flatbeds and higher resolutions, most vnedors will let you comaprison shop based on your choices.

Once you have a few candidate models in mind, it’s a good idea do a little Googling and asking colleagues for their opinions before you commit to buying.  Make sure the scanner you’re looking to buy has a good track record, and that users aren’t having frequent reliability or compatibility problems.  Some sites, such as imaging-resource.com and test freaks, provide detailed write-ups of each model they test, and even provide test scans and comparisons.

What we use

This past summer, the Scholarly Communication Center (the facility where I work) began refurbishing a public computer lab into what we will soon open as a Digital Curation Research Center.  This lab is being outfitted with hardware to tackle a number of different digital curation tasks, and among those pieces of hardware is a set of flatbed scanners for digitizing documents and photos.  After consideration of our  needs, purchasing a few models from different vendors, and sending quite a few of them back for being sub-ar to our requirements, we settled on a couple of different models.

(Please note: this isn’t an endorsement of any specific scanning vendor.  Your needs may be different, and could require you to purchase something different from the choices made here).

Standard, letter-size scanner: The majority of our flatbed scanning work will be done on EPSON Perfection V300 flatbed scanners.  They are capable of imaging at 4800 x 9600 dpi, have built-in film and slide scanners,support Mac and Windows systems, and have this unique horizontal hinge that allos the top cover to lift to the side in a way that can support brittle books really well.  All for under $90 apiece.
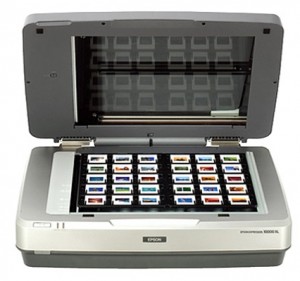
Plus-size/bulk transparency flatbed scanners (2): The lab has two tabloid-size scanning workstations: one Microtek Scanmaker 1000XL Pro we had purchased from a Previous project, and anEPSON 10000XL Photo scanner.  The Microtek scanner is a workhorse and provides excellent imagery, but unfortunately is no longer for sale in the United States now that the company has exited the retail market.  The Epson model, however, is a worthy successor, and provides excellent tabloid support in addition to some batch-slide scanning capabilities.  In some of our slide-scanning projects, we’ve been able to arrange up to 30 slides at a time and have this scanner produce individual, 3200 dpi scans of each frame, completing each set in about an hour.

What about All-in-One printers/scanners/faxes?

The All-In-One solution is a tempting proposition for some very small outfits and home users.  In fact, a lot of printer and scanner manufacturers like HP, Canon, Kodak and EPSON fill their product lineups with these combo devices.  They’re beneficial for users who have occasional light scanning and printing needs, and provide repeat business for the vendors, who can sell these devices at a loss knowing that users will have to come back later for ink and supplies.

These solutions will make sense for home users who have boxes of photos and documents in their attics and closets, and want to preserve these items in a digital form while clearing out some space.  I fact, use an HP Photosmart C4000 series printer/scanner combo in my home, and am quite happy with it.  However, I wouldn’t recommend such items for regular business or institutional use.  Bear in mind that just like any other combo device, you may find yourself having to toss a perfectly good scanner if the printer portion happens to malfunction, or vice versa.  In my experience, printers and scanners get a lot more mileage in a business or institutional setting, and these units are just not built to withstand the sheer volumes that might be required of them in that environment.


SIDEBAR
»
S
I
D
E
B
A
R
«
»  Substance:WordPress   »  Rights: Creative Commons License